Wednesday, September 10, 2008

Linksys Range Expander Configuration

Linksys Range Expander is an excellent product that allows you to expand or extent the wireless signal of your linksys router or any other router. It has the capability to extend your signal to almost double the original range. Linksys Range Expander comes in three flavour
1) Version 1
2) Version 2
3) Version 3

Version 1:

Linksys Range Expander version 1 is comparitively easy to configure. This Range Expander has one Active Light and One Link Light. Along with that it has an autoconfiguration button. This is the best feature available with Version 1 Range Expander.

Using Autoconfiguration:The WRE54G Range Expander has an Auto Configuration button on its side panel that allows the device to repeat the signal coming from an Access Point or Wireless Router that has the highest detected signal strength. When the Auto Configuration button is pressed, the WRE54G will automatically configure itself to the Service Set Identifier (SSID), of the Access Point or Wireless Router that it’s repeating.

NOTE: The WRE54G’s Auto Configuration feature will not work on security-enabled wireless networks and disabled SSID broadcast. If you wish to use the Auto Configuration feature, make sure wireless security is disabled on the Access Point or wireless router that you wish to connect with.

Steps:
1)Power on the range expander
2)Make sure the security is not enabled on the router.
3)Press the autoconfiguration button for 30secs while keeping the RangeExpander closer to the router.
4)Link and Activity light will glow in blue color.
5)If not try the same steps again.

For Secuirty enabled router:
Autoconfiguration option in Range Expander will not work if the router has been configured with Wireless Security. Here are the steps to follow.

1)Turn off you range expander.
2)Login to your wireless router get the wireless settings.
  • In IE type http://192.168.1.1 it will prompt for username and password.

  • Type the username and password(Default Username:admin Password:admin)

  • Once you are into Setup Page then click on Wirelss Tab

  • Under Wireless Tab you will have Wireless security click on it.

  • Make a not of all the wireless settings information


3) Turn off your router then turn on your RangeExpander.
  • In your laptop or computer see for the wireless signal named Linksys with Maximum Signal.

  • Connect to your Singal then assign a static ip address. To assign an ip address follow the step below

    • Go to Control Panel

    • Click on NetworkandInternet

    • click on Networkandsharing centre
    • On the right side click on Manage Network Connection
    • Right Click on Wireless Network Connection Icon

    • Click on properties
    • Under the General Tab in the white window select Internet Protocol TCP IPV4
    • Click on properties
    • Select Use the following Ip address option
    • In the Ip address field type 192.168.1.5 SubnetMask 255.255.255.0 Click ok

  • Login to the RangeExpander and then match the wireless settings. To login into the Range Expander type
    http://192.168.1.240 then hit enter. It will prompt you for Username and Password(Default: admin/admin).


  • After Matching the wireless settings you will get a Active and Link blue light


Now your range expander is ready to use. Place the Range Expander at any convenient location but make sure you have those two blue lights. Because the blue lights are the indication for you to understand that your Range Expander is configured properly.

How to configure your Range Expander V2 and V3?

This will be answered in my next post.

Thanks
Karthick M

Tuesday, September 9, 2008

Linksys Wireless Router Configuration

Linksys is a product of CISCO the leading company named for Network Products. One of the most reliable and cheapest SOHO router with high performance. Linksys router normally comes with the following feature.

1)Inbuilt Firewall(SPI firewall)

2)Hardware Firewall

3)Four Ethernet Ports(LAN)

4)One Internet Port(WAN)

5)Easy Setup CD

6)Omni Direction Antenna(s)

7)Easy Secure Setup button

8)One press reset

9)Supports A,B,G & N standard(Wireless)

10)Wide coverage 60ft(G),80ft(B),30ft(A),150ft(N)

11)Speed 54Mbps(G),11Mbps(B),54MBps(A),>300Mbps(N)

12)Supported Encryption(WEP, WPA, WPA2,WPA(Radius))

13)Support 11 channels

14)Allows Remote Management.

15)Allows QoS configuration.

16)Allows Mac-Filtering

17)Allows Port-Forwarding

18)Allows DMZ configuration.

19)Allows to create log for each user.

20)Inbuilt DHCP server.

Configuration Part I

configuring Linksys Wireless router for cable connection:

Configuring Linksys router for cable connection is a very easy job than for any other type of connection.
Steps to be followed.
1)Check the internet connection:
Connect the computer to the modem and check if you are able to get online.If you are cable to get online then click on StartMenu-->Run-->type "CMD"(Click OK). Command prompt will appear then type "ipconfig" and find the ip address. For example the display will be like the one below.


Ethernet adapter Local Area Connection:

Connection-specific DNS Suffix . :
IPv6 Address. . . . . . . . . . . : 2002:7bed:8d4b:9:acd2:b328:e2d4:328c
Site-local IPv6 Address . . . . . : fec0::9:acd2:b328:e2d4:328c%2
Temporary IPv6 Address. . . . . . : 2002:7bed:8d4b:9:1cab:5005:c9da:c373
Link-local IPv6 Address . . . . . : fe80::acd2:b328:e2d4:328c%9
IPv4 Address. . . . . . . . . . . : 71.168.2.100
Subnet Mask . . . . . . . . . . . : 255.255.255.0
Default Gateway . . . . . . . . . : 71.168.2.1

To more about Ip address Visit:

To confirm if you are online execute the following command.

C:\Users\KARTHICK MURUGAN>ping yahoo.com

Pinging yahoo.com [206.190.60.37] with 32 bytes of data:
Reply from 206.190.60.37: bytes=32 time=274ms TTL=49
Reply from 206.190.60.37: bytes=32 time=273ms TTL=49

Ping statistics for 206.190.60.37:
Packets: Sent = 4, Received = 4, Lost = 0 (0% loss),
Approximate round trip times in milli-seconds:
Minimum = 273ms, Maximum = 274ms, Average = 273ms

If you are getting four replies then you are online else you have to get in touch with your service provider to get it fixed.

2)Configuring the Router:
a)Disconnect the computer to any one of the Lan Port in the router.
b)Check if you are getting a light in the port to which it is connected.
c)connect a cable from your modem to the wan Port of the router.
d)Check if you are getting light in the wan port also.
e)Now the ip address as same as before this time you should get the ip address as below.

Ethernet adapter Local Area Connection:

Connection-specific DNS Suffix . :
IPv6 Address. . . . . . . . . . . : 2002:7bed:8d4b:9:acd2:b328:e2d4:328c
Site-local IPv6 Address . . . . . : fec0::9:acd2:b328:e2d4:328c%2
Temporary IPv6 Address. . . . . . : 2002:7bed:8d4b:9:1cab:5005:c9da:c373
Link-local IPv6 Address . . . . . : fe80::acd2:b328:e2d4:328c%9
IPv4 Address. . . . . . . . . . . : 192.168.1.100
Subnet Mask . . . . . . . . . . . : 255.255.255.0
Default Gateway . . . . . . . . . : 192.168.1.1

f)Open an Internet explorer and in the address bar type http://192.168.1.1 and then hit enter

g)It will prompt for an username an password. After typing in the username(admin) and password(admin).Click the "OK".

i)You will be into a blue Setup page called Linksys Setup page.

j)In the setup page you will see a configuration type drop down box.

k)From the drop down select "Automatic Configuration DHCP" and click "SaveSettings" button.You will get a popu up with a message"Settings are successful please click continue". You have to click "continue". After few seconds you will be back to the setup page.

l) Click on Mac-Address-clone buttion. In the new screen you will see a Radio button with two options enable and disable. Select enable option and then click on "Clone Your Mac-Address Clone" button. Click on "SaveSettings" button to save your changes.


m)Once your back into the Original Page. Go to "Status" page then look for an Internet Ip address which should have some value other than 0.0.0.0.

If you got an ip address then you are good to go then check if you are online. You should be online.

Basic Wireless Configuration:
Once you are online then the second part of configuration is wireless configuration.
To configure the wireless portion of a wireless router

Click on "Wireless Tab"


1)Under Wireless tab you will have "Basic Wireless Settings","Wireless Security","Wireless Mac Filter" and "Advanced Wireless Settings".

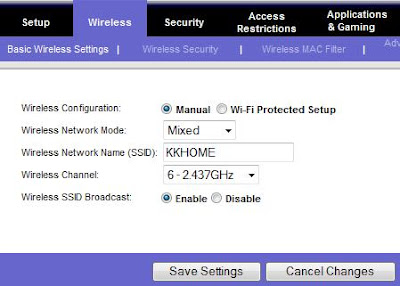
2)Basic wireless configuration require Basic Wireless Settings and Wireless Security Tab. Under Basic Wireless Settings you will have many option to tune your wireless capability.
  • Wireless Network Mode
  • Wireless Network Name(SSID)
  • Wireless Channel
  • Wireless SSID Broadcast


  • Wireless Network Mode:
    There are four option that you can select.
    • Disabled
    • B-Only
    • G-Only
    • Mixed


    The best and the default option is "Mixed".

  • Wireless Network Name(SSID):

    This can be anything of your choice(ex:myhome,jackhome etc). Whenever you search for any wireless signal in your laptop or computer you will see this name.

  • Wireless Channel:

    There are 11 different channels that you can choose. Out of 11 there are three better channels that you can use 1,6 and 11. Because this three channels are non overlapping channels. This three channel will have less interference.The default option is 6

  • Wireless SSID Broadcast:
    There are two options available they are enable and disable. For basic wireless router configuration it is recommended to be in enable. the default option is also enable


  • Click "Save Settings" to save the changes.

  • Wireless Security


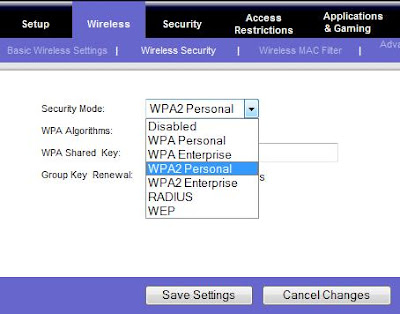
    This feature allows you to enable security for your wireless signal. There are 4 basic security that can be used without any additional resources.They are
    • Disabled
    • Wep
    • WPA personal
    • WPA2 Personal
    Apart from this there are some other option that requires a radius server they are
    • RADIUS
    • WPA EnterPrise
    • WPA2 Enterprise


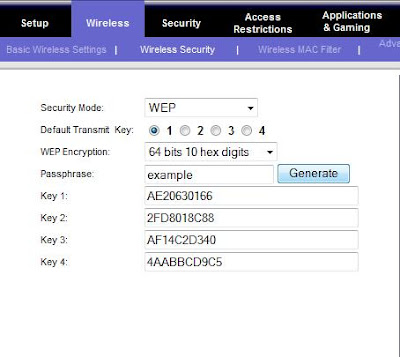
    Select any of the security option. If wep is selected then you will be prompted to type a passphrase and then you will have a generate button click on that then it will display four ten digit keys. Make a note of that ten digit number.So that whenever you connect with your signal you can use this ten digit number to authenticate the signal.
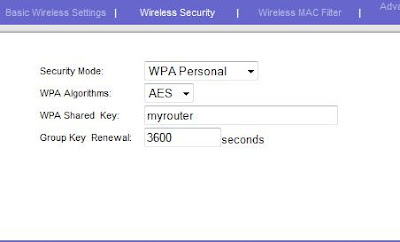

    WPA:
    If your option is WPA then you will have an option to type a passphrase(minimum 8 character).The same eight digit key will be your password. Use the password to connect with your signal from your laptop/computer.

    WPA2 Personal
    It is same as WPA personal but the difference is compare to WPA personal this have a stronger encryption algorithm.


Frequently Asked Questions:

A)How should I find what type of connection is mine?

1)Under Direct connection find the Ip address using the step 1. If you are finding an ip address under ethernet adapter local area connection other than 0.0.0.0,169.254.x.x or 192.168.x.x (ex:72.x.x.x,123.x.x.x) then you are connection is cable.

2)If you are having an Ip address under PPPoE adapter then it is a DSL connection in Bridge Mode.

3)If you are having an Ip address like 192.168.1.x,192.168.2.x,10.x.x.x,172.161.x.x then it is also a DSL connection in NAT mode.

B)I am getting an ip address in Status page but still I am not online.

1)Turn off the power to the router then to the modem. wait for approximately 30Secs.
2)Turn on the power to the modem first and wait for the modem to settle(ie wait for all the lights to lit up except the data light.)
3)Turn on the power to the router then wait for the power light to get solid. Once it is solid then you will get a Data light in the modem.
4)Check if you are online, you should be online.

C)Still I am not online after trying power cycle.

1) In the command prompt type ping 4.2.2.1 and check if you are getting four replies

C:\Users\KARTHICK MURUGAN>ping 4.2.2.1

Pinging 4.2.2.1 with 32 bytes of data:
Reply from 4.2.2.1: bytes=32 time=259ms TTL=55

Ping statistics for 4.2.2.1:
Packets: Sent = 4, Received = 4, Lost = 0 (0% loss),
Approximate round trip times in milli-seconds:
Minimum = 259ms, Maximum = 259ms, Average = 259ms

If you are getting four replies then try to ping yahoo.com then you will get the following response.

PING RESPONSE COULD NOT FIND HOST
This shows issue with a DNS server. How to configure a DNS server to resolve this issue.
Start==>Search-->Control Panel\Network and Internet\Network Connections-->Right Click on LocalAreaConnection--->(Click)on properties-->Click on Network Tab-->HighLight TCP/IP IPv4-->Click on properties-->Select "Use the following DNS server address"-->then type the primary and secondary DNS Server address.

Primary-->4.2.2.1
Secondary-->4.2.2.2
Then click ok.

Try to ping yahoo.com check if you are getting 4 replies then you will definitely online.

4)I am not able to ping 4.2.2.1

While pinging 4.2.2.1 if you are getting Request Timed Out then try restarting the computer. If it doesn't work then try disabling you antivirus then try to ping 4.2.2.1 you should get 4 replies.

5)I am getting Media Disconnected message when I try to find an Ip Address using step 1.

This is because the cable is not connected properly between the router and the computer. To check that you can check for the light on the port to which the computer is connected.If it is not glowing then secure the cable properly into the port.

Sunday, September 7, 2008

Linksys Wired Router Configuration

Linksys is a product of CISCO the leading company named for Network Products. One of the most reliable and cheapest SOHO router with high performance. Linksys router normally comes with the following feature.

1)Inbuilt Firewall(SPI firewall)

2)Hardware Firewall

3)Four Ethernet Ports(LAN)

4)One Internet Port(WAN)

5)Easy Setup CD

6)Omni Direction Antenna(s)

7)Easy Secure Setup button

8)One press reset

9)Supports A,B,G & N standard(Wireless)

10)Wide coverage 60ft(G),80ft(B),30ft(A),150ft(N)

11)Speed 54Mbps(G),11Mbps(B),54MBps(A),>300Mbps(N)

12)Supported Encryption(WEP, WPA, WPA2,WPA(Radius))

13)Support 11 channels

14)Allows Remote Management.

15)Allows QoS configuration.

16)Allows Mac-Filtering

17)Allows Port-Forwarding

18)Allows DMZ configuration.

19)Allows to create log for each user.

20)Inbuilt DHCP server.

Configuration Part I

configuring Linksys Wired router for cable connection:

Configuring Linksys router for cable connection is a very easy job than for any other type of connection.
Steps to be followed.
1)Check the internet connection:
Connect the computer to the modem and check if you are able to get online.If you are cable to get online then click on StartMenu-->Run-->type "CMD"(Click OK). Command prompt will appear then type "ipconfig" and find the ip address. For example the display will be like the one below.


Wireless LAN adapter Wireless Network Connection:

Connection-specific DNS Suffix . :
IPv6 Address. . . . . . . . . . . : 2002:7bed:8d4b:9:acd2:b328:e2d4:328c
Site-local IPv6 Address . . . . . : fec0::9:acd2:b328:e2d4:328c%2
Temporary IPv6 Address. . . . . . : 2002:7bed:8d4b:9:1cab:5005:c9da:c373
Link-local IPv6 Address . . . . . : fe80::acd2:b328:e2d4:328c%9
IPv4 Address. . . . . . . . . . . : 71.168.2.100
Subnet Mask . . . . . . . . . . . : 255.255.255.0
Default Gateway . . . . . . . . . : 71.168.2.1

To confirm if you are online execute the following command.

C:\Users\KARTHICK MURUGAN>ping yahoo.com

Pinging yahoo.com [206.190.60.37] with 32 bytes of data:
Reply from 206.190.60.37: bytes=32 time=274ms TTL=49
Reply from 206.190.60.37: bytes=32 time=273ms TTL=49

Ping statistics for 206.190.60.37:
Packets: Sent = 4, Received = 4, Lost = 0 (0% loss),
Approximate round trip times in milli-seconds:
Minimum = 273ms, Maximum = 274ms, Average = 273ms

If you are getting four replies then you are online else you have to get in touch with your service provider to get it fixed.

2)Configuring the Router:
a)Disconnect the computer to any one of the Lan Port in the router.
b)Check if you are getting a light in the port to which it is connected.
c)connect a cable from your modem to the wan Port of the router.
d)Check if you are getting light in the wan port also.
e)Now the ip address as same as before this time you should get the ip address as below.


Wireless LAN adapter Wireless Network Connection:

Connection-specific DNS Suffix . :
IPv6 Address. . . . . . . . . . . : 2002:7bed:8d4b:9:acd2:b328:e2d4:328c
Site-local IPv6 Address . . . . . : fec0::9:acd2:b328:e2d4:328c%2
Temporary IPv6 Address. . . . . . : 2002:7bed:8d4b:9:1cab:5005:c9da:c373
Link-local IPv6 Address . . . . . : fe80::acd2:b328:e2d4:328c%9
IPv4 Address. . . . . . . . . . . : 192.168.1.100
Subnet Mask . . . . . . . . . . . : 255.255.255.0
Default Gateway . . . . . . . . . : 192.168.1.1

f)Open an Internet explorer and in the address bar type http://192.168.1.1 and then hit enter

g)It will prompt for an username an password. After typing in the username(admin) and password(admin).Click the "OK".

i)You will be into a blue Setup page called Linksys Setup page.

j)In the setup page you will see a configuration type drop down box.

k)From the drop down select "Automatic Configuration DHCP" and click "SaveSettings" button.You will get a popu up with a message"Settings are successful please click continue". You have to click "continue". After few seconds you will be back to the setup page.

l) Click on Mac-Address-clone buttion. In the new screen you will see a Radio button with two options enable and disable. Select enable option and then click on "Clone Your Mac-Address Clone" button. Click on "SaveSettings" button to save your changes.


m)Once your back into the Original Page. Go to "Status" page then look for an Internet Ip address which should have some value other than 0.0.0.0.

If you got an ip address then you are good to go then check if you are online. You should be online.


Frequently Asked Questions:

A)How should I find what type of connection is mine?

1)Under Direct connection find the Ip address using the step 1. If you are finding an ip address under ethernet adapter local area connection other than 0.0.0.0,169.254.x.x or 192.168.x.x (ex:72.x.x.x,123.x.x.x) then you are connection is cable.

2)If you are having an Ip address under PPPoE adapter then it is a DSL connection in Bridge Mode.

3)If you are having an Ip address like 192.168.1.x,192.168.2.x,10.x.x.x,172.161.x.x then it is also a DSL connection in NAT mode.

B)I am getting an ip address in Status page but still I am not online.

1)Turn off the power to the router then to the modem. wait for approximately 30Secs.
2)Turn on the power to the modem first and wait for the modem to settle(ie wait for all the lights to lit up except the data light.)
3)Turn on the power to the router then wait for the power light to get solid. Once it is solid then you will get a Data light in the modem.
4)Check if you are online, you should be online.

C)Still I am not online after trying power cycle.

1) In the command prompt type ping 4.2.2.1 and check if you are getting four replies

C:\Users\KARTHICK MURUGAN>ping 4.2.2.1

Pinging 4.2.2.1 with 32 bytes of data:
Reply from 4.2.2.1: bytes=32 time=259ms TTL=55

Ping statistics for 4.2.2.1:
Packets: Sent = 4, Received = 4, Lost = 0 (0% loss),
Approximate round trip times in milli-seconds:
Minimum = 259ms, Maximum = 259ms, Average = 259ms

If you are getting four replies then try to ping yahoo.com then you will get the following response.

PING RESPONSE COULD NOT FIND HOST
This shows issue with a DNS server. How to configure a DNS server to resolve this issue.
Start==>Search-->Control Panel\Network and Internet\Network Connections-->Right Click on LocalAreaConnection--->(Click)on properties-->Click on Network Tab-->HighLight TCP/IP IPv4-->Click on properties-->Select "Use the following DNS server address"-->then type the primary and secondary DNS Server address.

Primary-->4.2.2.1
Secondary-->4.2.2.2
Then click ok.

Try to ping yahoo.com check if you are getting 4 replies then you will definitely online.

4)I am not able to ping 4.2.2.1

While pinging 4.2.2.1 if you are getting Request Timed Out then try restarting the computer. If it doesn't work then try disabling you antivirus then try to ping 4.2.2.1 you should get 4 replies.

5)I am getting Media Disconnected message when I try to find an Ip Address using step 1.

This is because the cable is not connected properly between the router and the computer. To check that you can check for the light on the port to which the computer is connected.If it is not glowing then secure the cable properly into the port.

Types Of Internet Connections

Before understanding how to configure and use Linksys Product it is necessary for us to understand the type of internet connection. Normally in US and other eastern countries most of the internet connection will fall under any one of the category below.
  • Dial Up
  • Broadband
  • Cable Connection
  • DSL Connection
  • Satellite Connection
  • Static Ip connection.
  • Wireless internet such as sprint

Dial Up Connection:

This is oldest method of internet connection used in earlier days. Some of them are still sticked to Dial Up connection for no reason. Dail Up connection offers very negligible speed which may sometime make us to get frustrated of its slow speed. Main and most important disadvantage which leads to the decline of dial up connection is that no router allows you to share the dial up internet. This is because speed you receive from dial up connection is very negligible and it will not be nothing if it is still shared.

Broadband Connection:

Broadband connections gives more bandwidth and it is comperatively cheaper than other connections. Broadband connection will allow the user to use both the telephone line and the internet connection at the same time. Broadband offers two ways of authentication.

Authentication Type:

1) Session authentication

2) Username and password authentication.

Session authentication:

Normally, computer or a laptop connected to the broadband connection get an ip address automatically. But however it will allow the user to get online without authenticating their authentication server. To authenticate their server they would give an username and password. It is necessary for us to provide an username and password where it is prompted to authenticate your server. Then you will be granted access to use the internet connection.

Username and Password authentication:

Provider allows you to connect to the internet only when you are authenticated. This type of connection will not give you any ip address unless you are completely authenticated. Once you are authenticated, you are ready to get online.

Cable Connection:

Cable connection is type of internet connection which is widely used among all people throughout the globe except India. In India Cable Service providers are very very less in number. Cable internet connection works on mac-address authentication. The type of ip address which you get from Cable connection will be public address. Public address is very important for one to use their X-box, Ftp, Media-Server, Web Server hosted on your computer.

Mac-Address Authentication:

Mac-Address authentication allows an user to get online based on their mac-address which is registered on the service provider database. This mac-address will be uploaded into the service-provider database by the engineer who install the service for you or the software that comes with the modem.

DSL Connection:

DSL connection is the competitive Service to Cable Connection. DSL connection both Public Ip address and Private Ip address. There are two modes available in DSL connection.

1) Bridge Mode.

2) Nat Mode.

Bridge Mode:

Bridge Mode allows you to get an public ip address but it requires authentication.

Nat Mode:

It will give you a private ip address but doesn't require any type of authentication which mean the username and password will be already entered into the modem.

SATELLITE CONNECTION:

This is the type of connection which is becoming popular all over the world. Reason behind why the people prefer this connection is for its outstanding speed. But comparatively it is very expensive than any other connection. This connection also allows you to get a public ip address. But the main drawback with this connection is that most of the router doesn't support this type of connection.

Wireless Internet Service:

This is special type of internet connection which allows the user to get internet although they are geographical isolated from the heart of the country. This will allows you to get either a public ip address or private ip address depending upon the provider. There are only few routers that support this type of Internet service.